原生方案
Android在Android12更新时支持了原生的高斯模糊,但是基本只能用于窗口模糊或者ViewGroup模糊。大概效果如下:
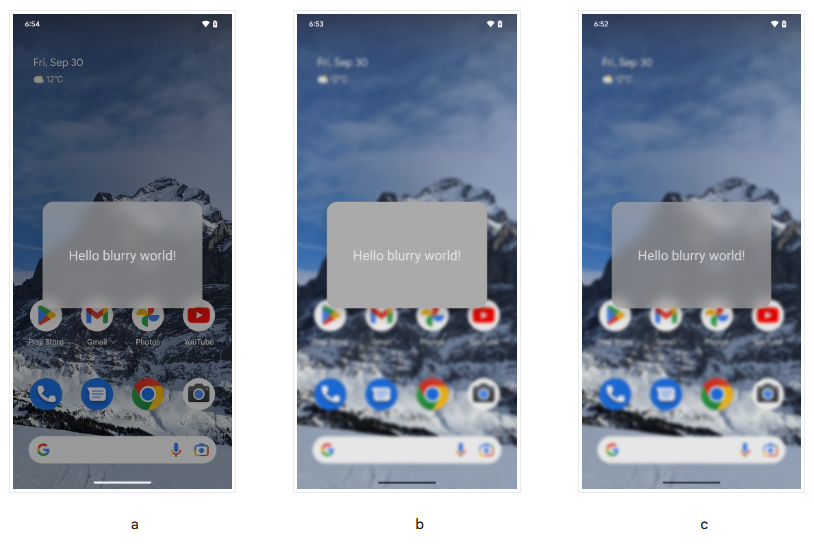
分别为:仅背景模糊处理 (a)、仅模糊处理后方屏幕 (b)、背景模糊处理和模糊处理后方屏幕 (c)。我们希望达到的要求为a效果,下面是官方的a效果的使用方案步骤。
对浮动窗口使用背景模糊处理可实现窗口背景效果,这是底层内容的模糊处理图像。如需为窗口添加模糊处理的背景,请执行以下操作:
- 调用 Window#setBackgroundBlurRadius(int) 设置背景模糊处理半径。或者,在窗口主题中设置 R.attr.windowBackgroundBlurRadius。
- 将 R.attr.windowIsTranslucent 设为 true,使窗口变为半透明。模糊处理是在窗口 Surface 下面绘制的,因此窗口必须是半透明的,才能显示出模糊处理效果。
- (可选)调用 Window#setBackgroundDrawableResource(int) 添加具有半透明颜色的矩形窗口背景可绘制对象。或者,在窗口主题中设置 R.attr.windowBackground。
- 对于具有圆角的窗口,可通过将具有圆角的 ShapeDrawable 设为窗口背景可绘制对象来确定模糊处理区域的圆角。
- 处理启用和停用模糊处理的状态。如需了解详情,请参阅在应用中使用窗口模糊处理的准则部分。
但是这个方案有很多问题:
- 我不是在单独窗口使用模糊,或者我希望在当前页面简单显示一个View(Group)
- 低于Android12的处理逻辑过于复杂
第三方库方案
根据更新时间,使用成本,以及Star数量,我选择使用:
https://github.com/Dimezis/BlurView
它不仅可以在多种View显示需求下使用,并且自动适配了低于Android12的代码。
使用步骤
1. 导入第三方库
2. 设置布局
- 你需要用一个 `BlurTarget` 包裹你目前的根布局。假设你的毛玻璃View出现在固定的位置,则你只需要包裹原来View的父布局即可,这样比较节省占用!
- 然后你需要把需要模糊的内容放在 `BlurView` 布局中
- 注意注意注意!!! `BlurView` 与 `BlurTarget` 为同级,而非父子布局!!!
示例:
    <!--This is the content to be blurred by the BlurView.
    It will render normally, and BlurView will use its snapshot for blurring-->
    <eightbitlab.com.blurview.BlurTarget
        android:id="@+id/target"
        android:layout_width="match_parent"
        android:layout_height="match_parent">

        <!--Your main content here-->

    </eightbitlab.com.blurview.BlurTarget>

    <eightbitlab.com.blurview.BlurView
      android:id="@+id/blurView"
      android:layout_width="match_parent"
      android:layout_height="wrap_content"
      app:blurOverlayColor="@color/colorOverlay">

       <!--Any child View here, TabLayout for example. This View will NOT be blurred -->

    </eightbitlab.com.blurview.BlurView>
3. 模糊配置
    private fun setupBlurView() {
        val radius = 20f  //模糊半径,越大占用越多!

        val windowBackground = window.decorView.background

        binding.blurView
            .setupWith(binding.target)           // ← 要模糊的根View,通常是最接近的父容器
            .setFrameClearDrawable(windowBackground)  // 防止透明区域变黑/变奇怪
            .setBlurRadius(radius)
    }
性能适配
以上代码基本可以实现很多毛玻璃效果。但是我推荐你在低端机型关闭这个效果,使用地透明度的纯色背景。
下面是一个直接可以使用的性能监控工具,它会在运行10秒后返回平均结果,你可以根据结果重新设置布局属性(当然我推荐你保存下来这个结果,避免每次打开都重复获取和设置):
注意:
- CPU 使用率:Android 从 API 26(Oreo)开始,系统越来越严格限制普通 App 读取其他进程的 /proc/[pid]/stat,但读取 整体系统 的 /proc/stat 仍然在大多数设备上可行(不保证 100% 成功,尤其是一些定制 ROM 或高安全设备可能会返回空或抛异常)。
- 这个工具类只计算整体系统 CPU(不是只算你 App 的),因为你关心的是“设备当前是否很忙”,而不是只看自己 App。
工具代码:
import android.os.Handler
import android.os.Looper
import android.view.Choreographer
import java.io.RandomAccessFile
import kotlin.math.max
import kotlin.math.min

/**
 * 10秒性能快照工具类
 * - 监控 FPS(UI 渲染帧率)
 * - 监控整体系统 CPU 使用率(通过 /proc/stat)
 * - 10秒后返回结果,并给出是否“高占用”的简单判断
 */
class PerformanceSnapshot private constructor() {

    companion object {
        // 单例懒加载
        val instance by lazy { PerformanceSnapshot() }
    }

    private var frameCount = 0L
    private var lastFrameTimeNs = 0L
    private var fpsSamples = mutableListOf<Double>()   // 每秒一个 FPS 样本

    private var cpuSamples = mutableListOf<Float>()    // 每秒一个 CPU% 样本

    private var prevIdle = -1L
    private var prevTotal = -1L

    private val handler = Handler(Looper.getMainLooper())
    private val choreographer = Choreographer.getInstance()

    private val frameCallback = object : Choreographer.FrameCallback {
        override fun doFrame(frameTimeNanos: Long) {
            if (lastFrameTimeNs == 0L) {
                lastFrameTimeNs = frameTimeNanos
            }

            frameCount++

            val elapsedNs = frameTimeNs - lastFrameTimeNs
            if (elapsedNs >= 1_000_000_000L) {  // 每秒计算一次
                val fps = (frameCount * 1_000_000_000.0) / elapsedNs
                fpsSamples.add(fps.coerceIn(0.0, 120.0))  // 限制合理范围

                frameCount = 0
                lastFrameTimeNs = frameTimeNanos
            }

            choreographer.postFrameCallback(this)
        }
    }

    /**
     * 采集一次 CPU 使用率(整体系统)
     * 返回 -1 表示读取失败
     */
    private fun sampleCpuUsage(): Float {
        try {
            val reader = RandomAccessFile("/proc/stat", "r")
            val line = reader.readLine() ?: return -1f
            reader.close()

            val toks = line.split("\\s+".toRegex()).filter { it.isNotBlank() }
            if (toks.size < 11) return -1f

            // cpu user nice system idle iowait irq softirq steal guest guest_nice
            val user   = toks[1].toLongOrNull() ?: 0L
            val nice   = toks[2].toLongOrNull() ?: 0L
            val system = toks[3].toLongOrNull() ?: 0L
            val idle   = toks[4].toLongOrNull() ?: 0L
            val iowait = toks[5].toLongOrNull() ?: 0L
            val irq    = toks[6].toLongOrNull() ?: 0L
            val softirq= toks[7].toLongOrNull() ?: 0L
            // 忽略 steal/guest 等(通常为0)

            val total = user + nice + system + idle + iowait + irq + softirq
            val idleDiff = idle - prevIdle
            val totalDiff = total - prevTotal

            return if (prevTotal > 0 && totalDiff > 0) {
                val usage = 100f * (totalDiff - idleDiff) / totalDiff
                usage.coerceIn(0f, 100f)
            } else {
                -1f
            }.also {
                prevIdle = idle
                prevTotal = total
            }
        } catch (e: Exception) {
            return -1f
        }
    }

    /**
     * 开始 10 秒监控,返回结果
     * @param onComplete 回调:(平均FPS, 平均CPU%, 是否认为是高占用)
     */
    fun startMonitoring(onComplete: (avgFps: Double, avgCpu: Float, isHighLoad: Boolean, message: String) -> Unit) {
        // 重置
        fpsSamples.clear()
        cpuSamples.clear()
        frameCount = 0L
        lastFrameTimeNs = 0L
        prevIdle = -1L
        prevTotal = -1L

        // 第一次采样 CPU(建立基线)
        sampleCpuUsage()

        // 开启 FPS 监控
        choreographer.postFrameCallback(frameCallback)

        // 每秒采样一次 CPU(大约 10 次)
        var seconds = 0
        val cpuSampler = object : Runnable {
            override fun run() {
                if (seconds >= 10) {
                    // 停止监控
                    choreographer.removeFrameCallback(frameCallback)
                    handler.removeCallbacks(this)

                    // 计算平均值
                    val avgFps = if (fpsSamples.isNotEmpty()) {
                        fpsSamples.average()
                    } else 0.0

                    val avgCpu = if (cpuSamples.isNotEmpty()) {
                        val valid = cpuSamples.filter { it >= 0 }
                        if (valid.isNotEmpty()) valid.average().toFloat() else -1f
                    } else -1f

                    // 我的简单高占用判断逻辑(可自行调整阈值)
                    val isHighLoad = when {
                        avgCpu < 0 -> false                     // 无法读取 CPU → 不算高
                        avgCpu > 80f -> true                     // CPU 非常高
                        avgCpu > 65f && avgFps < 48.0 -> true    // CPU 中高 + FPS 偏低
                        avgFps < 42.0 -> true                    // FPS 严重偏低(即使 CPU 不高)
                        else -> false
                    }

                    val msg = buildString {
                        append("10秒监控结果:\n")
                        append("  • 平均 FPS: %.1f\n".format(avgFps))
                        append("  • 平均 CPU: %.1f%%\n".format(avgCpu))
                        append("  • 判断:${if (isHighLoad) "高占用(建议关闭模糊)" else "正常"}")
                        if (avgCpu < 0) append("\n(CPU 数据读取失败,仅参考 FPS)")
                    }

                    onComplete(avgFps, avgCpu, isHighLoad, msg)
                    return
                }

                val cpu = sampleCpuUsage()
                if (cpu >= 0) cpuSamples.add(cpu)

                seconds++
                handler.postDelayed(this, 1000L)
            }
        }

        handler.post(cpuSampler)
    }
}
使用代码:
// 在适当的地方调用(比如 Fragment/Activity 的某个按钮或初始化时)
PerformanceSnapshot.instance.startMonitoring { avgFps, avgCpu, isHighLoad, message ->
    Log.d("Perf", message)

    if (isHighLoad) {
        // 关闭模糊
        binding.blurView.setBlurRadius(0f)
        // 或完全 detach:blurView.setupWith(null) 等
    } else {
        // 恢复模糊
        binding.blurView.setBlurRadius(20f)
    }
}
我依然推荐你在打开APP(或者某个Activity)3-5秒后再启动这个工具。因为内容加载以及页面频繁跳转CPU计算或许会有影响!
2026年1月4日更新内容
如果你是在Activity中调用了一个次级窗口或者其它Activity,那么你或许需要使用下面的方案,以下以BottomSheetDialogFragment
            //差不多就是,在跟View添加BlurTarget,然后获取根布局的BlurTarget,setupWith它就可以了
            val activity = context as? Activity ?: return
            val targetView = activity.window.decorView.findViewById<BlurTarget>(R.id.target)
            mVB.blurView.setupWith(targetView)
                .setBlurRadius(15f)
                .setFrameClearDrawable(activity.window.decorView.background)
                .setBlurAutoUpdate(true)
圆角的方案:
        viewModel.blurView.outlineProvider = object : ViewOutlineProvider() {
                override fun getOutline(view: View, outline: Outline) {
                    // 直接根据 View 的宽高设置圆角矩形
                    // 16f.dpToPx() 是将 16dp 转为像素,如果你没有扩展函数,可以直接写数值(比如 48)
                    val radiusInPx = TypedValue.applyDimension(
                        TypedValue.COMPLEX_UNIT_DIP, 16f, resources.displayMetrics
                    )

                    // 设置圆角矩形区域 (左, 上, 右, 下, 半径)
                    outline.setRoundRect(0, 0, view.width, view.height, radiusInPx)
                }
            }